Monday, September 24, 2012

Update!!!! Chicken Taco Soup recipe revisited with an easier method.


Hello Again!

I wanted to repost an old blog from a couple of years ago because I can feel fall in the air! It is time to break out my favorite fall/winter foods and this recipe is one of them. I am proud because it is the only recipe that I ever made up. Plus I have an awesome update to the recipe that makes it SOOOO much easier! Hopefully you have a Kitchenaid mixer, because if you don't, you are missing out. Go! Go get one now, or ask for it for Christmas like I did (It was the only gift I got that year because my WHOLE family teamed up to buy it for me) It is sooooo worth the money. You can't have mine because my family has been instructed to bury me with it when I die. Here is the original post with updates added in red, hope you like it:

Hey all!

Guess I need to update more often, but while at times the stories come back to back, sometimes they are spaced out.....as am I. So on to the story. My dear sweet 8 year old (now 11 yo) girl, Ray bear, told me about a month ago that she feels sad for cows when she eats hamburgers (Maybe she's not mine after all, I never feel guilt over a good burger or steak..YUM!). So she wants to become a vegetarian....I am going to try to support her, tofu and all (Yeah, that didn't last long, mostly because I decided that cooking two meals was too much work). I have checked out some books and am studying up on vegetarianism and I told her that after a visit to the doctor we can start on that. Now her sweet little almost 7 year old (now 10 yo) sister, Stinkerboo, wants to be JUST like Ray bear, so she said the other day that she wanted to be a vegetarian too. Last night we had a non vegetarian meal for dinner, it was my made up recipe that I like to call Chicken Taco Soup (recipe to follow). It has black beans in it and it is mighty tasty. Stinkerboo said she hated beans and wouldn't eat it....I told her that vegetarians have to eat lots of beans. She froze and stared at me looking horrified, then she said "Nevermind....I don't want to be like Ray bear!" It was pretty cute. So as promised here is the recipe.

Chicken Taco Soup

Ingredients:

4 boneless skinless Chicken breasts
2 cans of chicken broth (or homemade if you have it)
1 pkg of Taco Seasoning (or make it yourself if you know how)
2 cans of rotel
2 cans of black beans (Drained and rinsed)
Salsa
Sour Cream
Cheese
Tostadas

Cook the Chicken in the crockpot until done. (No, I am not sure how long that is, but I ususally cook on High for a 3 hours or sometimes I use the handy little meat thermometer that comes with my crockpot and cook until the temp is 180.


Then take the chicken out of the crockpot and shred it with 2 forks using your kitchenaid mixer, if you have one. It's simple to do, just put the paddle attachment on (pictured below), 


 drop the cooked chicken in and turn the mixer on for about a minute or so and voila!! perfectly shredded chicken (you can thank me for this awesome tip in the comments section). 


You can leave the juices from the chicken in the crock pot and then throw the chicken back in. Add in the broth and taco seasoning and stir, 


 then add the beans and rotel and stir again. Cook it on Low til it is all warm and bubbly or until you are ready to eat...it is hard to ruin and the longer it sits the better it gets.


 Serve topped with salsa, sour cream and cheese and you can crumble the tostadas on top like Ramon does or break and dip them into the soup like I do, either way is YUMMYLICIOUS! ENJOY! And don't forget that beans are good for you!


P.S. The leftovers are EVEN BETTER!


Friday, April 8, 2011

House Rules...

I have to start off by Thanking Troye for posting on facebook about her project. It inspired me! She got the idea over at the pleated poppy which I am also linking here so that you can see more of these awesome pieces of artwork. I thought I would post mine with directions in case you are curious about how I did it, or if you want to make your own (P.S. I might consider making these for profit...hint, hint). So here goes...

First, you have to buy your supplies. I bought a blank canvas 24" x 48". I found out that Hobby Lobby will still take a 40% off coupon if you show it to them on your phone, so I got it for 40% off. Whatever you do, don't pay full price for your canvas. Also, I got some paint (whatever color you like for the edges), Scrapbook paper, paint brushes, mod podge (I bought the off brand and it worked fine) and Sharpies (Don't buy these at the craft store, you can get them at The Dollar Tree for a 1/4 of the price.)


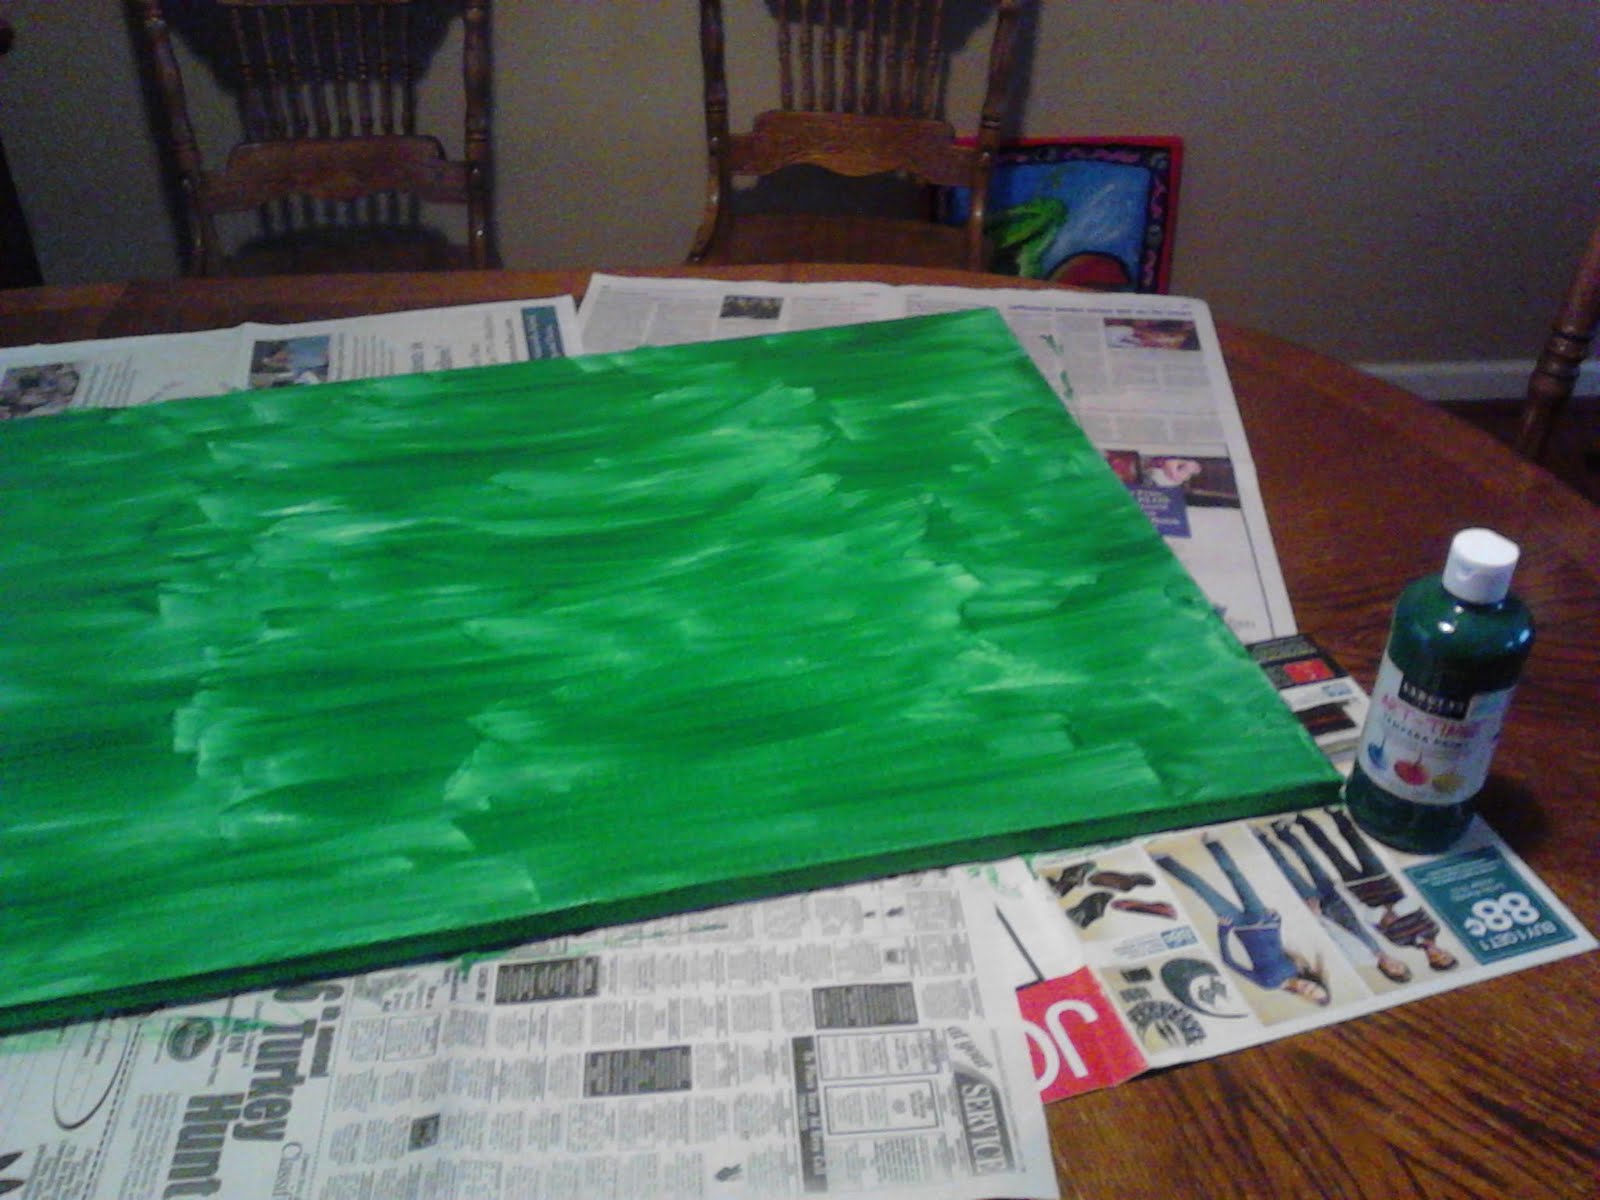
So, a lot of the ladies who have done this project said that paper shopping was the fun part....not for me. I found it to be overwhelming, but I am not really a scrapbooker either. So, this could be the best part for you. The first thing I did was to lay out the paper in the order that I felt looked most appealing from top to bottom. Although it is not matchy matchy, I wanted it to sort of flow from piece to piece. After my moment of organization I let my inner artist free. I ripped the plastic off my canvas and I got to work with my paint. I felt like a professional painter....Picasso, Degas, Monet....An Arteest if you will...I call it "Field of Grass". Unfortunately I had a choice to make, hang my masterpiece or finish my project...I couldn't afford another canvas, so I had to cover my artwork in order to finish my project. I found out that if you buy cheap tempera paint, you will need to paint at least two coats because this is what it looks like after one. It doesn't need to be perfect though, since most of it will be covered anyway.


Next was the fun part for me, I downloaded fonts...there are THOUSANDS of free fonts out there in internet world, it is truly amazing I just googled free fonts and found all sorts of fun stuff. I actually spent most of one day on the font part and, after hours of looking at and downloading all of the fun fonts and, wishing there was time for more, I got started. The first problem I encountered was that most scrapbooking paper is 12" x 12". and wouldn't fit in my printer, also, my canvas was 24" wide. So, I played around in open office (I currently don't have word, but the program I used was the OO version of power point.) I had to play around with it a lot, but I finally managed to make a template that was 6" tall by 24" wide. I then cut each piece of paper in half and configured it to print on 2 pages and then taped them together....there is probably a better way of going about this, but I had to do it any way I could figure out (comments about better ways are welcomed). Here is a screen shot of my first slide.


I typed all of the rules out in no particular order and figured which font should go with which rule. It is important in this step to know the difference between Their and there & also your and you're & lastly Too, to and two. In life it is also important to know these differences as well as the difference between lose and loose. I win, you lose.....My pants are very loose. Now you know!


 I used a scrap piece of scrapbook paper and did a practice run. I did the wavy cutting after I had printed it and taped it together.

Important Note Here!!! Don't glue your paper down until you have laid it all out and made sure that everything fits and flows, I didn't figure that out until about the 6th sheet when I realized I had a lot more rules left than I had room...OOPS! It's okay though, I made it work.

Another important note, make sure you have plenty of ink. I ran out of black ink about half way through and didn't feel like going to get more, so I printed in color and colored over it with sharpie. This was a very long and painful way of avoiding a trip to Walmart. 


This was also hard, because some of the fonts I was using were not solid, and I had to figure out a way to make them look the same without just coloring them in solid, which I could have easily done if I weren't an arteest.  For this particular font (I believe it is called candy shoppe) I used a pen and colored it in very painstakingly to make it look like it was painted on and weathered. It took hours....really....


 So, after I arranged all of the strips of paper, I glued them on with the decoupage and then I painted over the whole thing with more decoupage to seal it in. You may also notice that I used some of my left over edges glued down the sides to give it a more finished look since, for some odd reason, all of my edges weren't even. I have also read that others have used ribbon for this...I am too lazy innovative to go find need ribbon.  


In case you can't read them, here are my rules: 

Solis Family rules
Love the Lord Your God
Pray without ceasing
cuddle when you're sad
Thank God for this day, this family, this home
Never give up, you mustn't quit
Try new things with an open mind, you never know what you'll like
Always tell the truth
forgive easily
keep your promises
work cheerfully
sing silly, dance crazy, hug often, smile a lot
Encourage your siblings...Share in their joy
Use your manners...Yes, Please & No, thank you
Always say "I Love You"
Share everything...except bad ideas
Love Others
Choose whom you will serve
Be thankful, eat together, clean up after yourself
Husband, love your wife
wife, Always be on his side
Make the wise choice
Use Gentle Words

Now, go and be inspired to create!!!! Or just call me and I will make one for you for a price.

Tuesday, January 25, 2011

If Mama ain't happy, ain't nobody happy...

Okay, so I have been remiss (REALLY remiss) in blogging lately. I just haven't had many great kid stories lately. I still want to blog and I thought to myself "Self, why limit yourself to only funny kid stories?" So, having been inspired by my friend InJoyTroye and websites like Stephanie O'Dea's 365 days of crockpotting, I am going to blog about a recipe. My Favorite Recipe, Mama's Pasta....mmmm just the name is like Pavlov's bell and makes my mouth water. So here it is:
Ingredients:

1 lb. Mild Italian Sausage (or Hot if that's how you roll)
1lb. Sweet Italian Sausage
1 Medium Onion
5-6 Cloves of Garlic, minced (or more if you LOVE it like I do)
1/4 cup chopped fresh parsley
3/4 cup white wine, whatever you like, but not cooking wine because it's salty
5 cups canned plum tomatoes in tomato juice (This is usually about 2 of the large cans)
Salt & Pepper to taste
1 1lb. box farfalle pasta (a.k.a. bowtie pasta)
1 15.5 oz can Navy Beans, drained
1 1/2 cups chopped fresh arugula


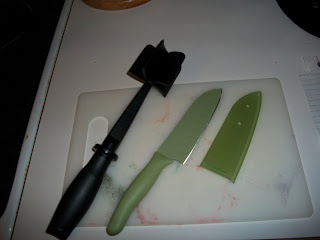
Alright, so I have to stop here for a minute and send a shout out to my Pampered Chef Consultant Melissa Jones for the awesome new cooking tools I earned for doing a show for her. I love my coated Santoku knife, because it is soooo sharp and cuts through everything like melted butter, however I really have to give PC mad props for the awesome black tool in the photo above. It is called a mix and chop and it takes browning ground meat from a chore to an art form. I will never go back to the old way. So, on to the recipe...

Crumble your sausage into a large pot, if it is in the form of links, remove the casing first. Add the onion, garlic and parsley and brown over high heat (this is where I used the mix and chop.) about 15 minutes or until the sausage is done.

Next, taste the wine to make sure it is still good (it might be a good idea to get a glass) and then add the 3/4 cup wine to the meat along with the tomatoes. Try to break up the tomatoes as best as you can, again the mix and chop came in very handy here. Let this simmer on medium for about 30 minutes.


Mmmm, can you smell that? Oh right, you can't because it's the internet, It smells good though.


While this is cooking, go ahead and chop up your arugula and cook the pasta according to the directions on the box. When you have cooked the meat mixture for 30 minutes, add salt & pepper to taste. Drain the pasta and stir it into the meat mixture. Add the beans and the arugula and let it cook until it is heated all the way through. Hint: the longer it cooks, the better it tastes.


This is really a one dish wonder, look at all the colors! It is really awesome and needs no side dishes or anything, you can just top it with some parmesan cheese and eat it up! As you can see, this dish not only makes Mama happy, it makes the whole family happy. Happy eating and tell me what you think of this dish!

Monday, February 1, 2010

A Proud Mommy Moment

Hello All 2 of you who follow my blog!!

Well, I haven't posted much in a while, but I just had to post this. So, this weekend My oldest son, Mr. Swag, and I went on a retreat together with our church. It is called Superstart and it is for 4th through 6th graders...they call them preteens....REALLY???? He's just a little boy to me, but anyway....the "preteens" were learning about sharing God's love. As I watched my 10 year old little boy taking in the music and the teaching I wondered what was going through his mind. Was he getting it? Have I done my part right to prepare him? I saw so many kids who were acting out God's love to each other (and some who clearly weren't), but my baby stayed quiet. I thought he must be pondering what he was hearing. Near the end of the event there was a concert by The Lads...quick shout out to the Lads...They ROCK (www.theladsband.com) and these kids LOVED THEM!! Sorry....I am rambling again...Anyway, for this concert, all of the kids were given a glow stick...they loved the glowsticks and were having fun with them. Then the leader of the event told them a story about a little light who learned about shining for God and he asked the children if they would give up their glowsticks in order to make a bigger picture out of them...the catch was that they couldn't have their glowsticks back if they donated them. That was it, they had a choice to make, as the buckets were passed some kids gave their sticks and some didn't. The buckets moved closer to us and I watched my son, he didn't give any indication that he was going to give his up. I couldn't fault him...he's a 10 yr old boy and glow sticks are cool, but then he turned to the kid next to him and said "when do we give them?" and I sat stunned as he realized that he was about to miss his chance and jumped up and ran to drop his stick in the bucket..I was so proud, I think he got it!!!

Since we came home on Saturday, I have watched just a bit closer, and although he loves to torture his sisters like most boys do, there is a sweetness there. I see how he cares for them and I can see the Father shining in my baby's face. I don't think I have done anything to deserve such an awesome kid, but I do thank my heavenly Father for him.

Sunday, August 30, 2009

The truth about vegetarians

UPDATE: In the interest of maintaining my family's privacy, I have given everyone a super cool nick name. Hope that's not too confusing for those of you who know us.

Hey all!

Guess I need to update more often, but while at times the stories come back to back, sometimes they are spaced out.....as am I. So on the the story. My dear sweet 8 year old girl, Ray bear, told me about a month ago that she feels sad for cows when she eats hamburgers (Maybe she's not mine after all, I never feel guilt over a good burger or steak..YUM!). So she wants to become a vegetarian....I am going to try to support her, tofu and all. I have checked out some books and am studying up on vegetarianism and I told her that after a visit to the doctor we can start on that. Now her sweet little almost 7 year old sister, Stinkerboo, wants to be JUST like Ray bear, so she said the other day that she wanted to be a vegetarian too. Last night we had a non vegetarian meal for dinner, it was my made up recipe that I like to call Chicken Taco Soup (recipe to follow). It has black beans in it and it is mighty tasty. Stinkerboo said she hated beans and wouldn't eat it....I told her that vegetarians have to eat lots of beans. She froze and stared at me looking horrified, then she said "Nevermind....I don't want to be like Ray bear!" It was pretty cute. So as promised here is the recipe.

Chicken Taco Soup

Ingredients:

4 boneless skinless Chicken breasts
2 cans of chicken broth (or homemade if you have it)
1 pkg of Taco Seasoning (or make it yourself if you know how)
2 cans of rotel
2 cans of black beans (Drained and rinsed)
Salsa
Sour Cream
Cheese
Tostadas

Cook the Chicken in the crockpot until done. (No, I am not sure how long that is, but I ususally cook on High for 3 hours or sometimes I use the handy little meat thermometer that comes with my crockpot and cook until the temp is 180. Then take the chicken out of the crockpot and shred it with 2 forks. You can leave the juices from the chicken in the crock pot and then throw the chicken back in. Add in the broth and taco seasoning and stir, then add the beans and rotel and stir again. Cook it on Low til it is all warm and bubbly or until you are ready to eat...it is hard to ruin and the longer it sits the better it gets. Serve topped with salsa, sour cream and cheese and you can crumble the tostadas on top like my husband, Senor Caliente, does or break and dip them into the soup like I do, either way is YUMM-O! ENJOY! And don't forget that beans are good for you!

Monday, August 3, 2009

First Blog and a toothfairy story

Hello Cyberworld!!! I am Kasey a crazed mom of three and I have been told I have a lot of funny stories and valuable insights to share (okay maybe I am over exaggerating about the valuable insights). So I have decided to start blogging. Maybe I will brighten someone's day.

So today I will start with my toothfairy story. My son, Mr. Swag, is 10 years old now. He doesn't believe in Santa or the Easter Bunny anymore. In my pathetic attempts to keep him young, I have refused to admit that I am the toothfairy. He doesn't believe me, so I pulled out a trick that my parents used on me, I was a dumb kid and my kid is smarter than I was...really. I told him to decorate an envelope and seal it and the toothfairy would magically take the teeth out and put the money in without tearing or opening the envelope. I would then steam the envelope open and voila! He would believe....yeah right. I told you, the kid is smart....he glued the stupid thing shut!!! He also wrapped it in floral wire. After 30 minutes with boiling water, tongs, tweezers and a glue stick, I got the money in the envelope and the wire very carefully wrapped back around it. I came in and woke the lazy head this morning. He picked the envelope up and looked at it and said "Nice try Mommy, but the wire was wrapped around the left side of the envelope" DOH!!! I still didn't admit to anything, though. I just said she might have accidentally pushed it to the other side. I am not sure if he believes me.....I think probably not.
Get widget